Difficulty rating: 4
Polish Rating: L’Oréal: A; Depend: B; Wet & Wild: A-
Hey all,
This manicure was inspired by this jewelry set from Pandora. I’ve had this set for ages, and really love the colors, but because the ring is so unique, I sometimes have a hard time matching it to my manicure. It’s been lying around my jewelry box for ages, and I decided that it was time to bring it back into my wardrobe. What better way than to make a jewelry inspired manicure?
For this manicure I used L’Oréal Color Riche in Midnight Mistress (deep navy blue); Depend in 54 (aqua/turquoise); and Spoiled by Wet n Wild in Trust Fund Baby (glitter).
Trust fund baby has small hex glitters in teal, gold, black and pink in a clear base, and it’s really quite gorgeous! Take a closer look:
Simply gorgeous! I truly have a weakness for glitter. I think I must have been a magpie in a previous life because if it glitters or sparkles – I’m intrigued. With regards to this glitter polish, I do find myself trying to arrange the glitter on my nail a little bit, so that’s my only complaint!
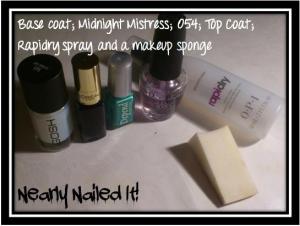
Now, for the rest of the manicure you’ll need the following:
You can choose to skip out on the base coat if you’re feeling particularly rushed, but then make sure that none of the colors you are using have a tendency to stain your nails. This usually means staying away from any reds, dark greens or blues – but it really depends on the make and formula of the nail polish. I played it on the safe side for this manicure, and used a Gosh Fix Base Coat 565 (originally made to be used under holographic nail polish to bring out their best effect – though it’s my only base coat at the moment & it works just fine).
I finish the entire manicure with a coat of OPI Top Coat, to give it longer wear and more shine. I also use OPI Rapidry spray in between steps to help my manicure dry faster and take less time. There are other quick-drying sprays and polishes out there, though. I’ve heard great things about Seche Vite as well, but have not had the opportunity to try it out just yet!
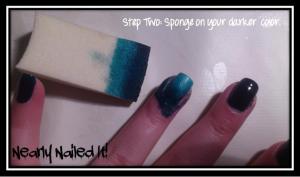
Choose your base colors and do your accent nail(s). I chose just to have one for this mani, as I think it will really draw attention to the ring. Don’t worry about the mess around your nails just yet – there’s more mess to come!
As you can see this step gets super messy! There are two ways to combat this: one, choose to have your color fade from light to dark, as dabbing the ends of your nails is less messy than dabbing near your cuticles (though I really like this effect); and two, you can choose to tape off around your nails to catch some of the mess. I probably should have used some tape, this was not so fun to clean.
If you look at my makeup sponge, you can see that I’ve added in the light aqua color as well as my dark color – despite my nails already being the lighter color. I do this because I think it makes the gradient look more natural and gradual, as the colors mix together on the sponge. Bear in mind that the sponge does soak the polish up quite quickly, so you need to work fast or reapply your color.
There you have it, a gradient nail. You can choose to leave it as it is, finishing with a top coat, or… you guessed it, add some glitter!
There you have it! A fun glitter and gradient manicure. I love how the blues in my gradient accent nail match the topaz on the ring, and the silver and gold glitter complement the silver and gold in my ring.
What do you think? Have you tried gradient manicures before? What colors are your favorite to work with?


Did you use 2 colours or just the one?
I used a navy blue on its own, on all my other fingers except the ring fingers on both hands, then I used a turquoise/aqua on my ring fingers (mixed with the navy) and finished off with a glittery top coat. 🙂